


How to Make a Silicone Candle Mould from an Object
- Jem the beekeeper

- Oct 24, 2025
- 10 min read
Updated: Oct 25, 2025
For those of you who I’ve met at shows, or given talks to, or for anyone who has seen the candles in my shop (or even bought one - thank you!), you’ll know that I make my own candle moulds using ornaments.

In this post, I’m going to share a simple step-by-step process of how I make a candle mould from a small handheld object.
As you’ll see in the steps, I’m not a perfectionist with my approach to this tutorial. The aim here is to give you the gist of how it works so you can have a go yourself. Once you’ve tried it, you can then experiment further if you want to, play with different shapes or techniques, and who knows - maybe you’ll have a prize-winning candle to enter in to your next honey show! Most importantly, just have fun with it and enjoy the creative process.
In order to make a mould as I do in the steps below, you will need the following things:
An object. The item you'd like to take a mould from!*
Cardboard material. This is to create a wall and a bottom for your object (you'll see what I mean in the steps)
Silicone. You want enough to cover the object fully.
A candle wick holder. You can improvise with a chopstick or a kebab skewer. You just need something to hold the wick in place whilst the wax sets.
Candle Wick. Candle wick manufacturers often have their own wick sizing guide online so take some measurements from your object to help you calculate the size you need to buy.
A blob of Blu Tack or glue. This is to stick your object to the bottom of your container if it's not a heavy object.
A pair of gloves. If you don't want to get sticky with silicone
A double boiler for melting wax
A clean mixing stick (can be something like a kebab skewer)
A biro/pen
Elastic bands
*Choosing an object – what should you try?
Choose something small and solid for your first go, nothing too delicate, nothing too fragile. Something with a reasonably sized bottom (!). The bottom of your candle is actually the entry point for the molten wax when pouring, so if the hole of the mould is too small, then you're going to pour wax everywhere. For your first go, try something that will fit in the palm of your hand... purely because if you do mess up the mould, silicone is expensive and it won't be a particularly expensive mistake. Will you get your object back unharmed? Pretty much, yes. BUT it could have the odd knife mark on it if you are not careful when you cut it out of the mould. Bear that in mind. Unsure? Look through my steps below first before deciding to try it. Then you'll get an idea of what you are doing. This should go without saying, but if the object doesn’t belong to you, ask the owner first!
OK, let's get on with it.


1) Get your object, ensure it's clean, and create an open-top container for it.
In this instance, my object is going to be the same glass paperweight I've used before. It's a heavy, solid object and is easy to keep in place. I have built cardboard walls for my moulds before (as you'll see in the gallery of images at the bottom of this post), but this time I am using part of a cardboard tube that used to house a diffuser. There is a good amount of space around the item once it's in the container. You do not want the item to be touching the cardboard. The gap is where the silicone will end up being. I have dusted my item and made sure it is clean from dirt.

2) Leave yourself a cutting guide - a pen mark basically.
Before I pour the silicone in, I looked at my item and thought about where the cut line might be. What's a cut line? Well, once the silicone has set, you need to be able to cut your item out and to reveal the mould for future candles. If you have a delicate pattern on your object and perhaps a plain side to it, then you might want to place the cut line on the plain side.
So what do you do? You look at your item in the container and visualise where you want the cut line to be. You then place a pen mark on the edge of the cardboard container. This is also why you want to ensure your item remains fixed in place - hence my suggestion to use a piece of Blu Tack or glue.


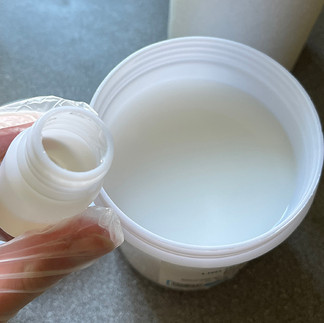


3) Prepare the silicone mix.
With your item securely in place at the bottom of the container, you now need to prepare your silicone. I buy various modelling brands of silicone (whatever is on offer usually!) and I had a spare 500g pot from my last order. You typically get a hardening agent which needs to be mixed in. Pop on your gloves if using them and mix your liquid materials together well. I just poured my small pot into the larger pot and mixed well. Take your time over this. I know from previous experiments that 500g is plenty to make a mould for my glass paperweight.


4) Slowly pour the silicone in to cover the item.
Go slowly and pour the mix in. I like to pour it on the top and let it flow down slowly. This approach seems to reduce the likelihood of any air bubbles. Seasoned model makers and mould makers might advocate for painting the silicone onto an object first to ensure even coverage, but I'm keeping it simple for this how-to. Some people even go so far as to put the whole thing in a vacuum chamber to remove any air bubbles whatsoever, but we are not working in that league with this tutorial.
IMPORTANT: You want to ensure you have at least 1 cm or more of silicone above the item. Once you've poured it all in, leave it to set as per the silicone instructions. Some air bubbles may appear on the surface and that's completely normal.

5) Mark the silicone.
Once the silicone has set and is solid and no longer sticky, you now need to find your earlier pen mark on the cardboard and continue it onto the mould, aiming for the centre. Why? You're now transferring the cutting mark onto the silicone and you need to do this because you're about to peel off all the cardboard to reveal your finished mould, and you still need to see where you’ve decided to cut. It’s your guide.


6) Peel away the cardboard or container material.
So now you see why I use cardboard - because it's so easy to remove! Peel away all of the cardboard from around your silicone mould.

7) Continue the cut mark down the side of the mould.
Use your pen to continue the cut mark along the side of the mould. Those of you who appreciate accuracy are welcome to use a ruler or a straight edge.

8) Continue the cut mark around to the base of your item.
You're aiming for the centre of the mould, so imagine drawing a line to the centre. You won’t get right to the centre because you’ll notice that the bottom of your object is in the way! That’s fine.


9) Carefully cut your item out of the silicone.
Ensure the mould is bottom side up, i.e. you can see the bottom of your item. This now becomes the top of the mould. Now take your scalpel and slowly slice into the mould, aiming for the centre. Use your pen mark to guide you. It's not easy to cut it, so go slowly. When I do it, I use one hand to gently prise the silicone apart and the other to make the cuts. I don't always achieve a single neat cut, so don’t worry if you need to make several cuts. Having a sharp blade helps!
IMPORTANT: You do not need to cut all the way down the side of the mould. You just want to cut enough so that it is easy to get your item out. If your object has a patterned surface with lots of inny bits and outty bits to it, then you will need to jiggle the object quite a bit to free it from the mould (full of technical terminology this how-to, isn’t it!?).


10) Create a wick hole.
Candles need wicks. This step is the reason why you ensured that you had at least 1 cm of silicone above the tip of the object when pouring it in. You now need to take a thick needle and poke it through the tip of the candle mould so it can be pulled out from the other side.
When I make my candles, I push the needle and wick through this hole each time and it stays nice and secure with no wax leaks underneath.


11) Let's test it! Prepare your Wick
Thread a pre-waxed wick onto a needle. Why pre-waxed? It stops air bubbles settling on the wick and reduces the risk of crackling sounds during the burn. Just dunk the wick in some molten beeswax, hold it up in the air for a few moments so the temperature drops, and then run it between your pinched fingers to smooth it off and get rid of excess wax. It should then be stiffer as it cools.

I appreciate I’m telling you to touch a wick that has been dunked in to hot wax! It's not a sensible thing to do really so alternatively just run the wick through a pair of attached chopsticks.


12) Thread the wick Thread the needle and then drop it down into the mould. Push it carefully through the hole you made earlier and pull it out the other side. Keep pulling it out until the wick appears. Detach the needle. You don't need a lot of wick on show, so you can always pull it back a bit if you’ve got too much showing. A few millimetres will be fine.

13) Set up the mould for candle making. Secure the wick and mould.
Turn the mould upright and let it sit down on the trapped wick end. Cut the wick so that it's just above whatever wick holder you're using. Now place elastic bands over the mould, just so that the cut seam in the silicone is sealed up neatly. Do not have the bands too tight or too loose! You'll work out the sweet spot as you get more familiar with this. Sometimes it is helpful to look inside the mould with a torch to see how the seam on the mould is lining up. Jiggle it if something isn’t positioned correctly.


14) Melt your wax (beeswax obviously, right!?) and pour!
I'm a beekeeper, so beeswax is what I use, but this method of making moulds is also suitable for other types of waxes. It's your call. To make my candles, I melt my beeswax in a double boiler, often using leftover hot water from cooking (get a double use out of that water and energy).
As you lift your vessel with molten wax towards the moulds, be sure to use a kitchen towel to wipe the sides of the vessel. Why? To remove water droplets and moisture. If you don't and a water droplet goes into the mould, you'll risk getting wet holes/bubbles in the tops of your finished candle. Here is a photo to show you what can happen when you get complacent and miss the wiping step!

Once wiped, tilt the vessel so the molten wax gently pours out the spout and into the mould. Pour carefully and fill it all the way to the top of your mould. This is the point where you realise whether or not you wish your item had a larger bottom to it!
15) Tap the mould and top up the wax if needed.
Tap it gently. Why? Just so that any air bubbles in the wax can pop up to the top. If you didn't do this, you might get miniature air bubble pockets on your finished candle.

After a few minutes, you might notice the level of the molten wax go down 1 mm or more. This is more likely to happen with beeswax. This is because the wax shrinks a bit as it cools. Be ready to pour just a little bit more wax back in to level it out if you need to.
Leave your candle aside to cool. I had fun doing this how-to as I poured a candle using my old mould at the same time. I wondered which mould would turn out best - the new one or the old one.


16) Once cool, remove it from the mould!
Remove the wick holder and the elastic bands. Prise open the candle mould and pull out your candle. I find it easy to grab the exposed wick with one hand and use the other hand to hold the mould open by the cut seam.


17) Trim wick and level the candle.
Cut the wick so it's as flush to the bottom of the candle as possible. Curved tip scissors, like the ones you get in vanity packs, are great for this (I didn't have have any when photographing this!). You might also want to trim the top of the wick down a bit to get it to an aesthetically pleasing height. You don’t want it too short though, as you want something you can light!
Then sit your candle down on a flat surface. Is it flat or wobbling a bit? I find that with a bit of downward pressure, I can make it sit flat. Alternatively, you can warm the surface the candle sits on, as then the wax will level with pressure more easily. Make sure it's a surface that can take heat if you are going to warm it!

18) Ta da!
There you go! I've shown you how to make a silicone candle mould. It's not too complicated and you will undoubtedly find different ways to go about things if you do start experimenting for yourselves.
Ever since I've dabbled with candle making, I've taken snaps with the camera to remind me of all the experiments, successes and failures I've had. Here's a gallery of images so you can see some of the moments. If this blog post has been of use to you, it'd be lovely if you could let me know :)


Comments